How to Connect Your Marketing Data to AI for Free - Google Ads, GA4, Search Console & Tag Manager (No Supermetrics)
£0
Total cost
60–90 min
One-time setup
4
Google connectors
Read-only
Safe by default

James Gurnett
Founder, Align & Scale · Former Head of Digital
Most marketers pay a monthly fee for one of the dullest jobs in the stack: moving their own data out of Google's tools and into a spreadsheet. Connector platforms like Supermetrics do exactly that, and they work, but you are renting a pipe to data you already own.
There is now a free alternative that does more. Using MCP connectors (Model Context Protocol, the open standard for plugging tools into AI assistants), you can wire Google Ads, GA4, Search Console and Google Tag Manager straight into an AI assistant (this guide uses Claude Desktop), running on your own computer with your own logins. No third party in the middle, no subscription, and because an AI is reading the data, you go from raw numbers to "here is what is wrong and what to do about it" in one step.
This is the complete guide. It contains every step, the exact configuration, and a full troubleshooting section covering every problem we hit during a real, end-to-end setup. Work through it top to bottom. Each connector also has a dedicated deep-dive page (linked in its section) with use cases and worked examples.
What is an MCP connector?
An MCP connector is a small program that uses the Model Context Protocol (MCP), the open standard for plugging tools into AI assistants, to give an AI secure, structured access to a data source. In plain terms, it lets an assistant like Claude talk directly to an API such as Google Ads or GA4 and read your data on demand, with no third-party platform in between.
What is AI marketing?
AI marketing is using an AI assistant to query, analyse and act on your live marketing data, not just to generate copy. Connecting your data sources, such as Google Ads, GA4 and Search Console, is what turns a general chatbot into a working marketing analyst that can spot wasted spend, compare channels and report results.
What you need and what to expect
A Windows PC (these steps are written for Windows; macOS is the same process with Mac-style paths).
The Claude Desktop app installed.
A Google account with access to the Google Ads, GA4 and Search Console data you want to read.
About 60 to 90 minutes for the full set the first time. It is mostly copy and paste plus clicking. No coding is required, even for the Tag Manager connector (you paste a file we provide).
Honest scope: this setup is read and analysis, not campaign editing. It pulls and interprets data; it does not change bids, budgets, tags or settings. GA4, Search Console and the Tag Manager build are read-only by design.
What you'll need
- A Windows PC (macOS works too)
- The Claude Desktop app
- A Google account with access to your data
- About 60 to 90 minutes, no coding
What you can do once it is connected
Instead of opening four dashboards, you ask in plain English:
"Pull every search term for this client last month and flag the ones spending money with no conversions."
"Show GA4 sessions and conversions by channel for the last 30 days versus the prior 30."
"What are my top organic Search Console queries, next to the paid terms I am bidding on?"
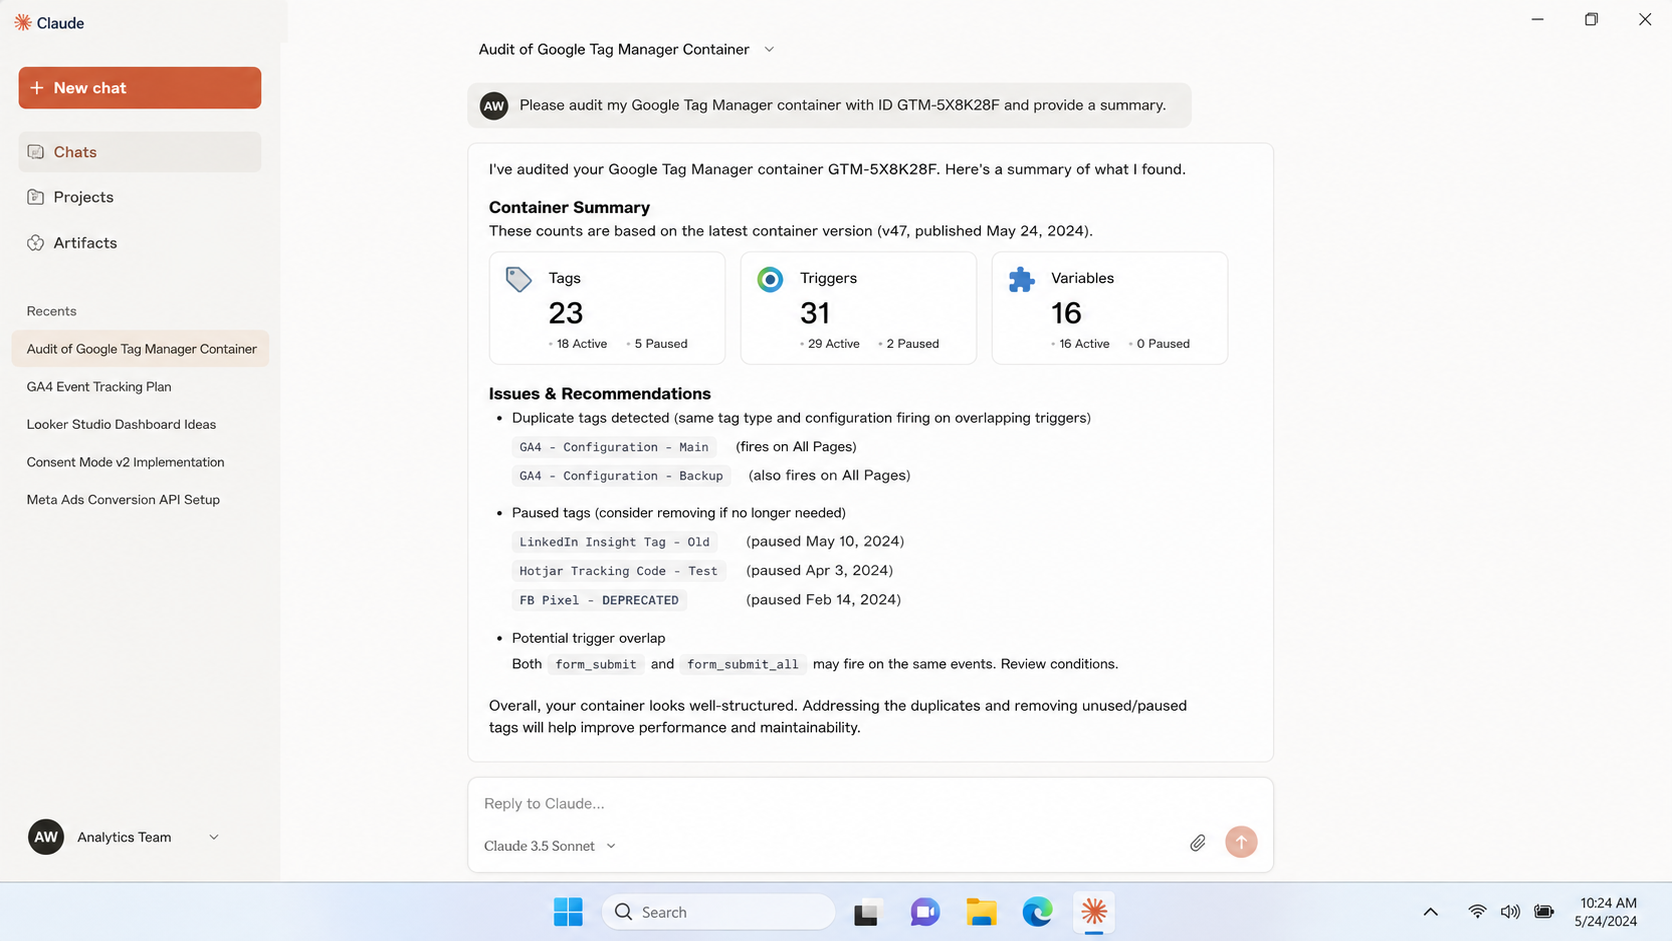
"Audit this Tag Manager container and tell me which conversion tags look broken."
In a real portfolio test, this surfaced in about an hour: a client wasting close to £300 a month on search terms that never converted, conversion tracking quietly misfiring so Smart Bidding was optimising blind, and budget stuck on losing campaigns while winners were capped by budget.
“Show me every search term last month with spend and no conversions.”
“Compare sessions and conversions by channel, last 30 days vs the prior 30.”
“Which queries get impressions but no clicks, and at what position?”
“Audit this container and flag any broken conversion tags.”
Part 1: Install Python
The connectors run on Python (free, safe, widely used). If you already have Python 3.10 or newer, skip to Part 2.
Go to python.org/downloads and click the Download button.
Run the installer. Recent downloads use the new "Python Install Manager", which handles your system PATH automatically, so there is no "Add to PATH" checkbox to worry about anymore.
A configuration window appears and asks a few questions. Answer them as follows:
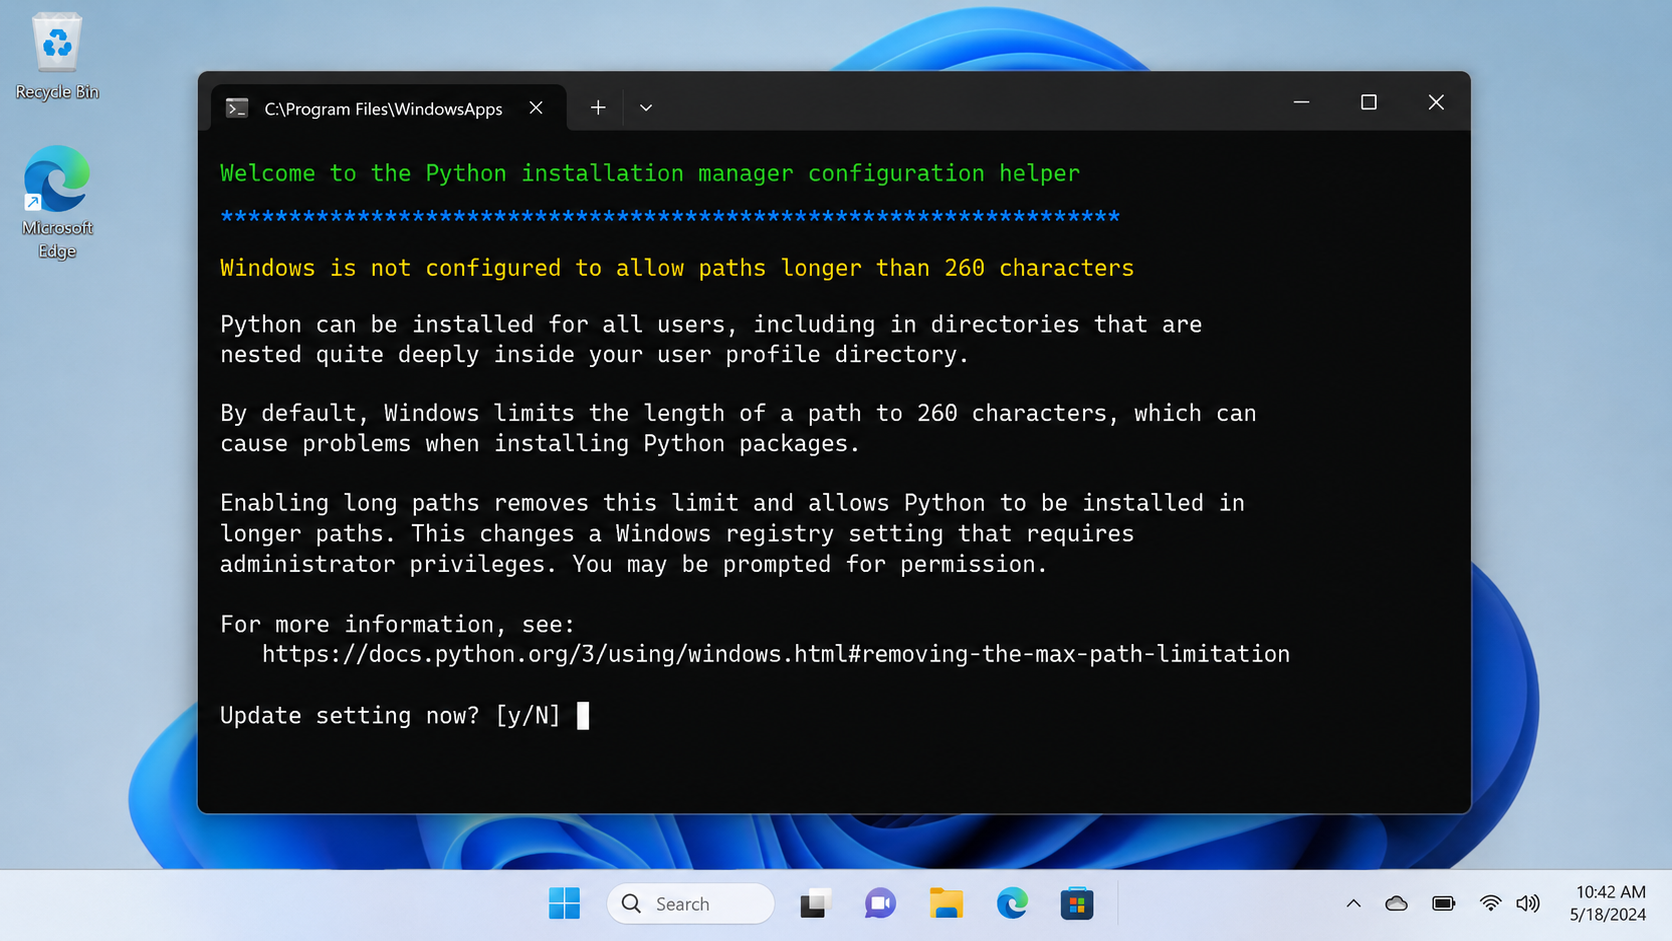
"Windows is not configured to allow paths longer than 260 characters. Update setting now?" Type y and press Enter, then approve the admin prompt. This prevents some package installs from failing.
"Add commands directory to your PATH now?" Type y and press Enter. This is the PATH step, handled as a prompt rather than a checkbox.
When asked to install CPython (the actual Python program), accept it.
"View online help?" Type n.
Restart your PC. The long-path and PATH settings only fully take effect after a reboot.
Confirm it works: open the Start menu, type terminal, open it, then type py --version and press Enter. You should see a version number such as Python 3.14.x.
Part 2: Create your Google Cloud project and OAuth credentials
All four connectors share one free Google Cloud project. You set this up once.
2a. Create the project
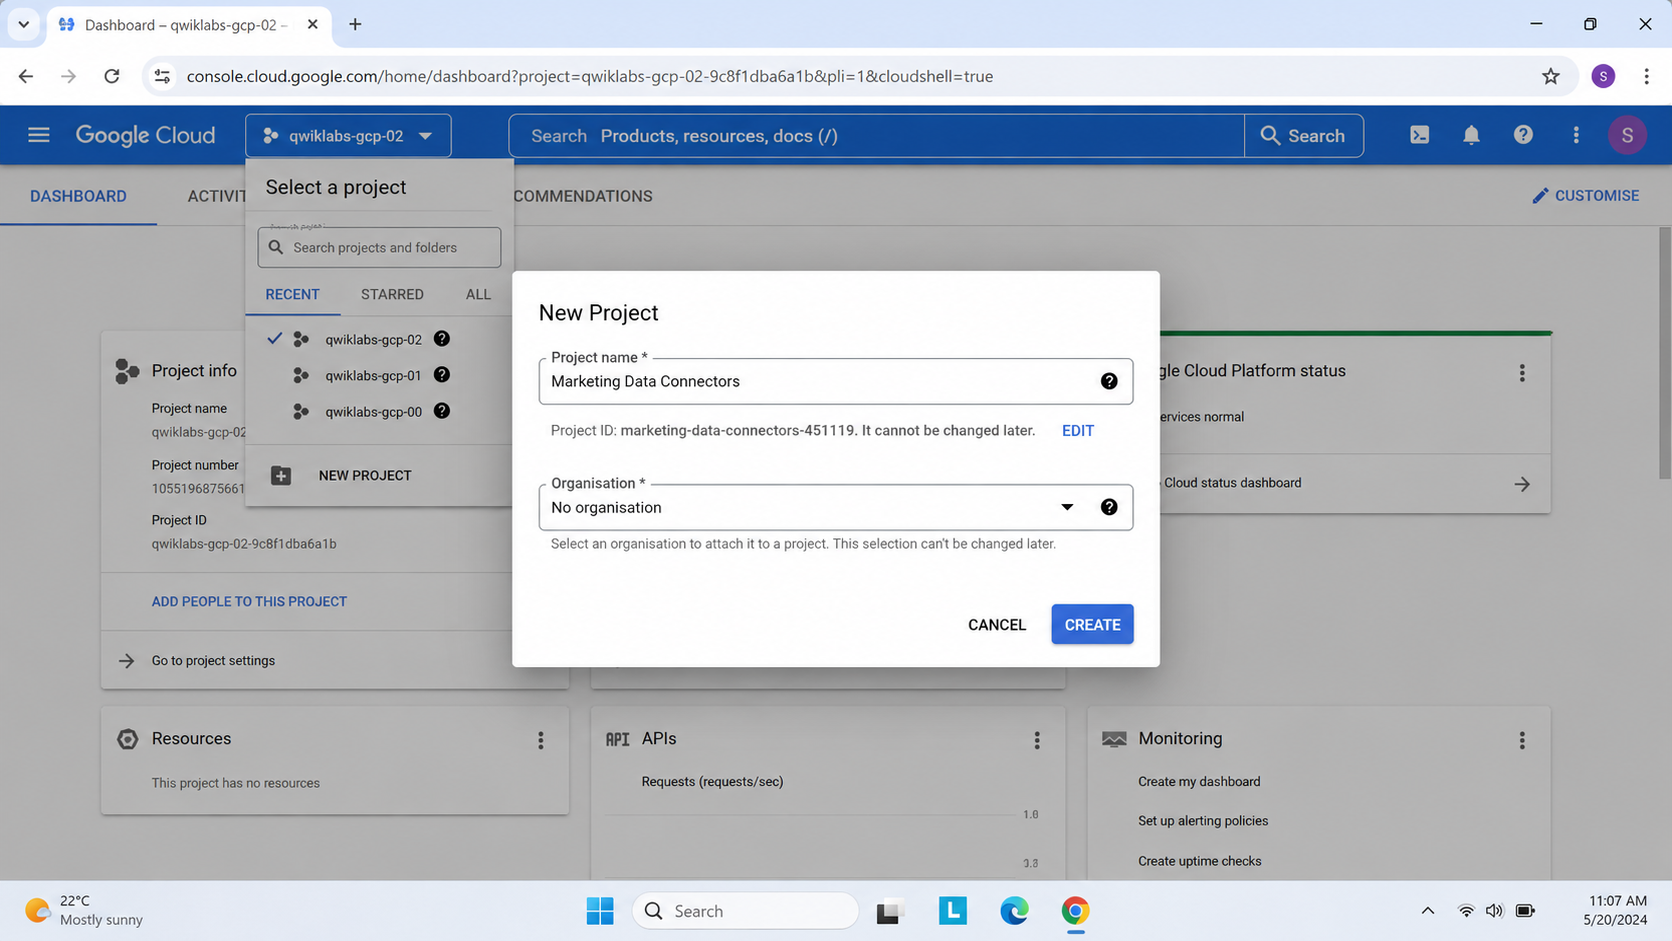
Go to console.cloud.google.com and sign in with the Google account that has access to your data.
Click the project dropdown at the top, then New Project. Give it a clear name such as "Marketing Data Connectors" and create it. Make sure it is selected in the dropdown afterwards.
Note your Project ID (shown on the Dashboard "Project info" card, a lowercase string such as marketing-connectors-123456). The Project ID is permanent and cannot be changed later; only the display name can. You will need the ID for GA4.
2b. Configure the OAuth consent screen
Left menu, APIs & Services, OAuth consent screen (it may be branded "Google Auth Platform").
Set User type to External and fill in an app name and your email.
Add yourself as a Test user.
Important: set the Publishing status to "In production" (Publish app). Leaving it in "Testing" causes refresh tokens to expire after about 7 days, which will break your connectors roughly weekly. For the read-only scopes here, used by you as the owner, production works as is; you may see an "unverified app" notice during sign-in, which is fine for your own app. (See "Understanding tokens" below for why this matters.)

2c. Create two OAuth clients
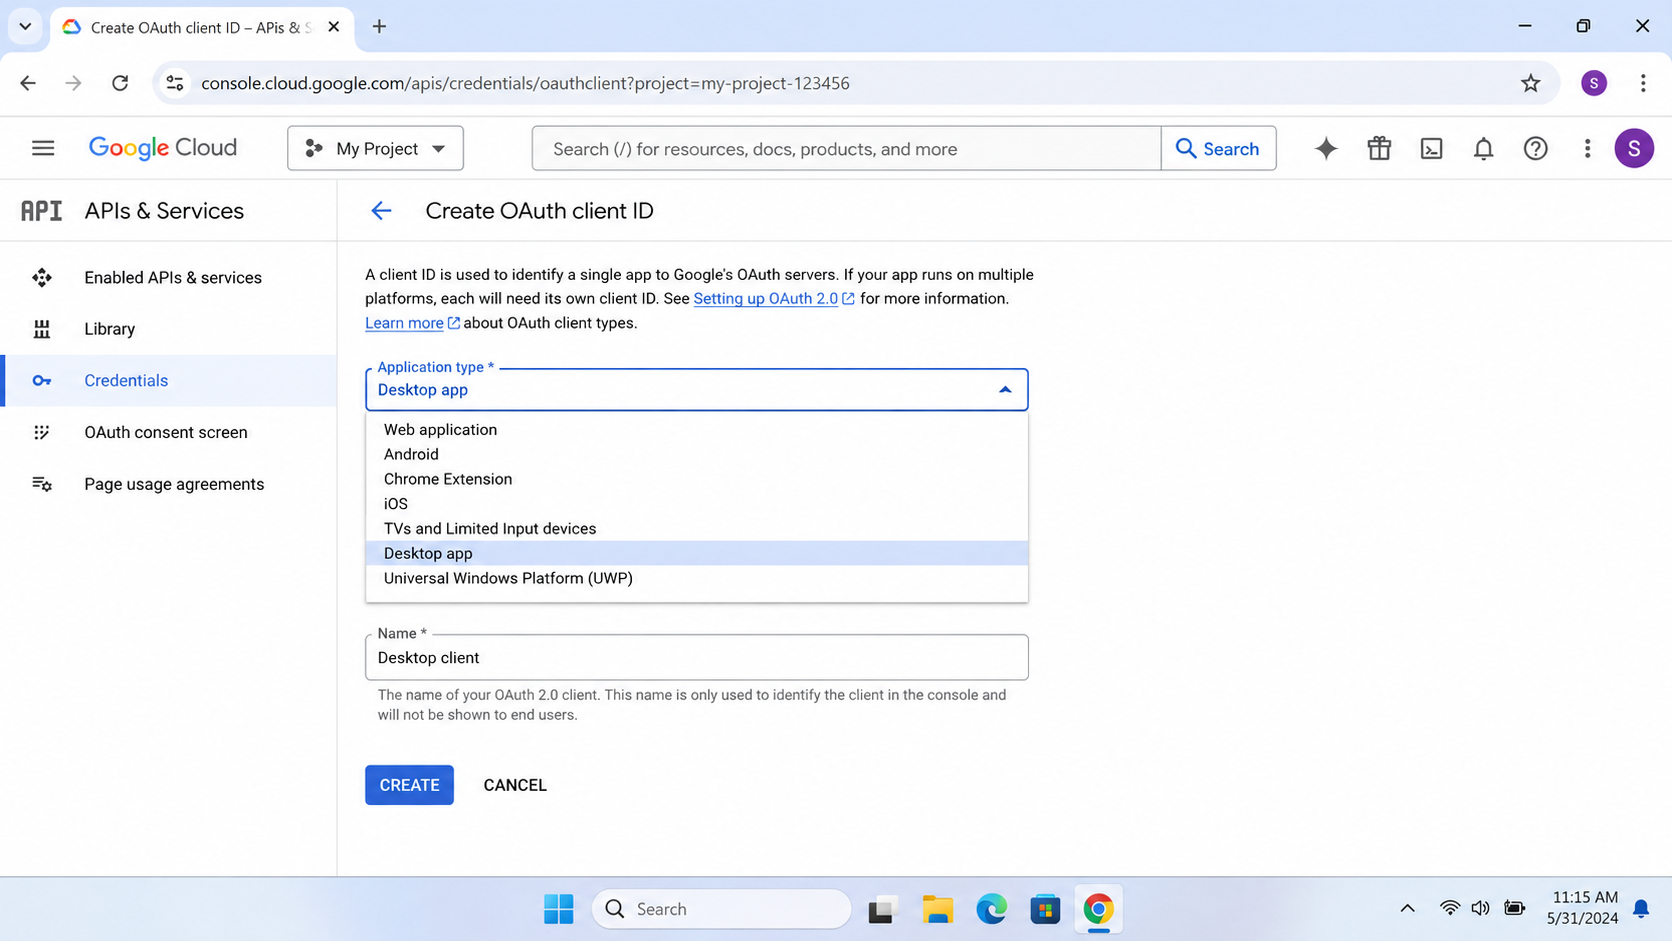
You need two OAuth clients from APIs & Services, Credentials, Create Credentials, OAuth client ID:
A "Desktop app" client. This is used directly by the Google Ads and Search Console connectors. After creating it, download its JSON (the Client secret file). If you cannot find a download button in the newer console, click into the client and copy the Client ID and Client secret; you can rebuild the file by hand (the format is shown in Parts 6 and 7).
A "Web application" client, used to mint refresh tokens through the Google OAuth Playground for GA4 and Tag Manager. Add the authorised redirect URI exactly: https://developers.google.com/oauthplayground. Copy its Client ID and Client secret.
Keep your Client secrets, developer token and refresh tokens private. Do not put them in screenshots or anything you share publicly.
Part 3: Set up the connector folder and shared environment
We put everything in one folder with one shared Python environment.
Download the Google Ads connector from github.com/cohnen/mcp-google-ads (green Code button, Download ZIP) and extract it to a folder you will remember. You will end up with a folder containing google_ads_server.py and requirements.txt. This guide calls it YOUR-FOLDER.
Open YOUR-FOLDER in File Explorer, click the address bar, type cmd and press Enter. This opens a command window already in the folder, which avoids any issues with spaces in the folder path.
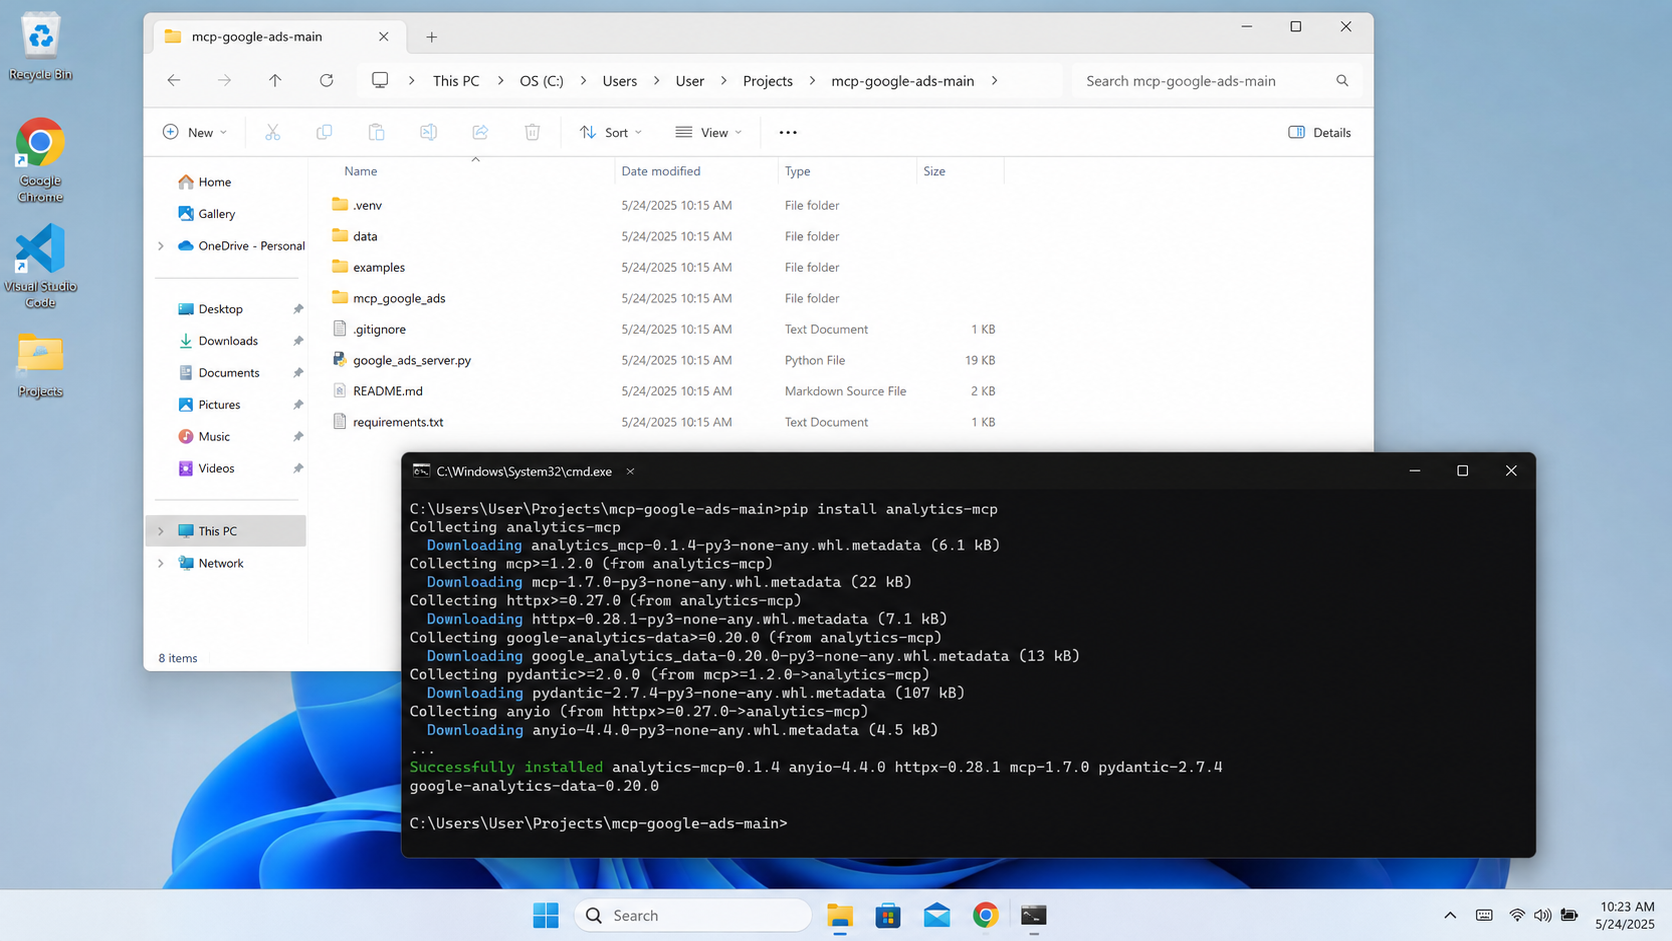
Run these four commands one at a time. They create one shared environment and install all the connectors you will need:
py -m venv .venv
.venv\Scripts\python -m pip install -r requirements.txt
.venv\Scripts\python -m pip install analytics-mcp
.venv\Scripts\python -m pip install mcp-search-console
.venv\Scripts\python -m pip install google-api-python-client
Each finishes when it returns to the prompt. The first one takes a few minutes. We call .venv\Scripts\python directly rather than "activating" the environment, which avoids PowerShell execution-policy errors that can otherwise block setup.
Tip: turn on file extensions now so later filename steps are foolproof. In File Explorer, View, Show, File name extensions (ticked).
Part 4: Google Ads
Get a developer token
The Google Ads API issues developer tokens only from a Manager (MCC) account. If you do not have one, create it free in a couple of minutes at ads.google.com/home/tools/manager-accounts and link your existing account to it.
In Google Ads, go to Tools, API Center, accept the terms, and copy the developer token. New tokens are granted "Explorer" access instantly, which allows live (production) account access up to 2,880 operations per day, more than enough for reporting.
In the Cloud Console, enable the Google Ads API (search for it in the top bar, then Enable).
Add the credential and configure
Save your Desktop OAuth client JSON into YOUR-FOLDER as credentials.json.
The Google Ads block of your configuration (full file in Part 8) uses your developer token and, if your accounts sit under a manager, your Manager ID as GOOGLE_ADS_LOGIN_CUSTOMER_ID (10 digits, no dashes). That one setting unlocks every client account under the manager; you tell the AI which account to use per request.
For use cases, worked search-term audits and wasted-spend examples, see the deep dive: Connect Google Ads to AI.
Prefer it handled for you? See our Google Ads management and Google Ads audit services.
| This setup (MCP + AI) | Paid connectors | |
|---|---|---|
| Monthly cost | £0 | Ongoing subscription |
| Where your data goes | Straight to Google | Via a third party |
| Analysis included | Yes, the AI does it | No, data only |
| Cross-channel in one place | Built in | Often extra |
| Best for | Analysis, audits, reporting | Always-on dashboards |
Part 5: Google Analytics 4 (GA4)
GA4 needs no developer token and no manager account, just your own login.
In the Cloud Console, enable two APIs: Google Analytics Data API and Google Analytics Admin API.
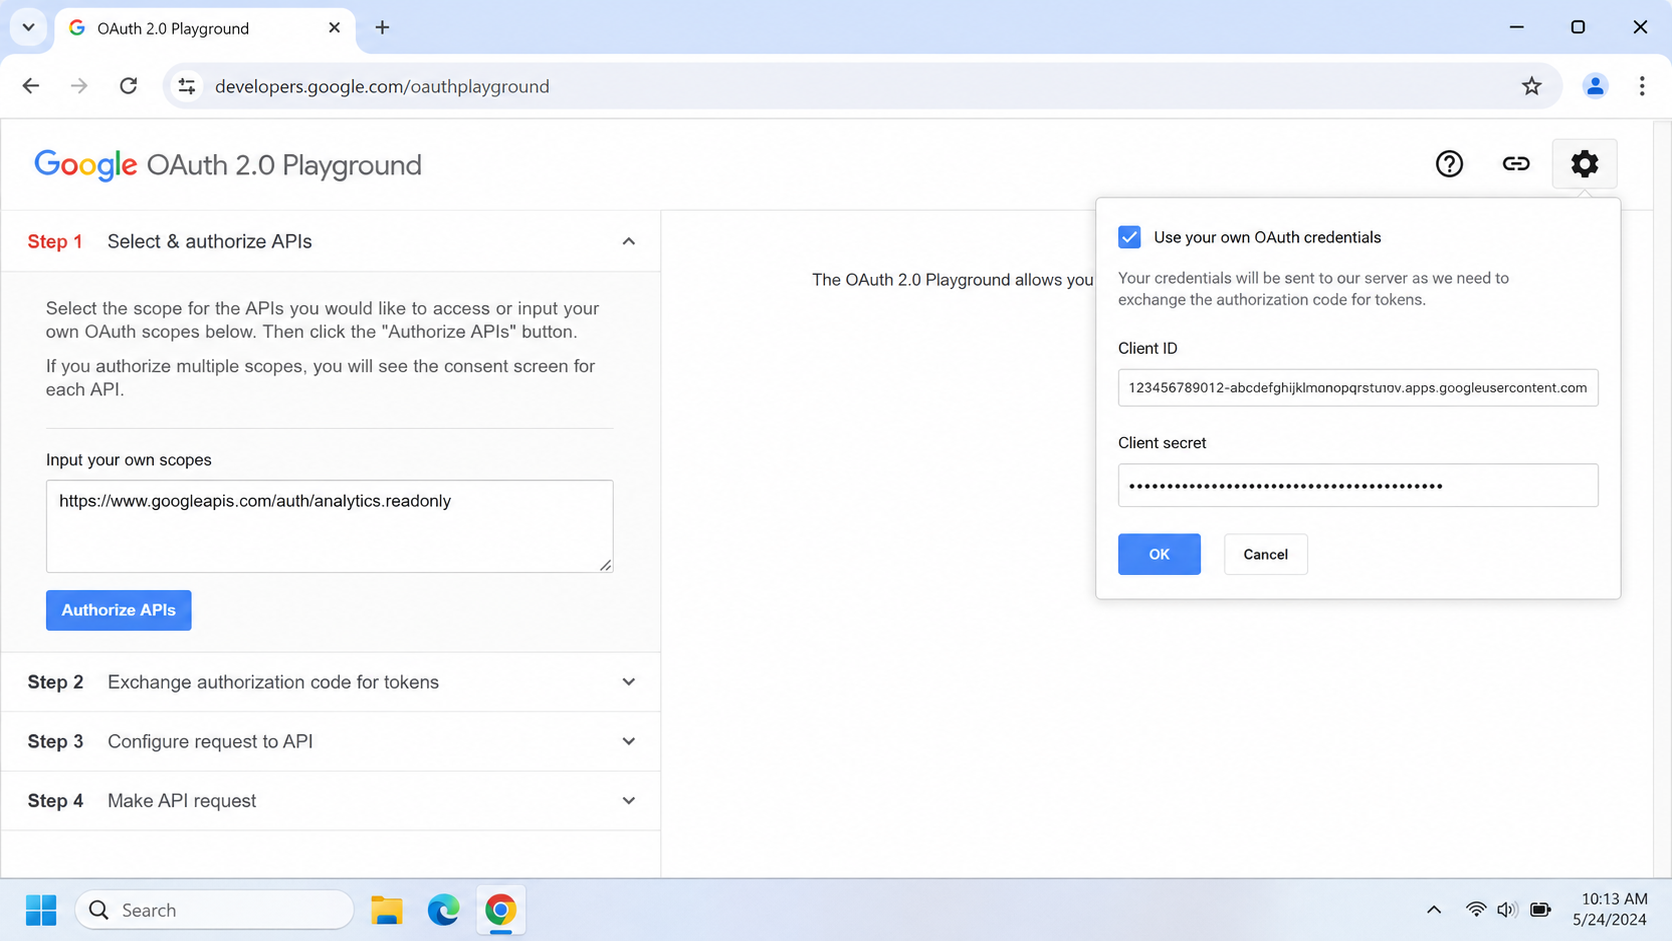
Mint a read-only Analytics token. Go to developers.google.com/oauthplayground, click the gear icon, tick "Use your own OAuth credentials", and enter your Web client's Client ID and Secret. In "Input your own scopes" paste https://www.googleapis.com/auth/analytics.readonly, click Authorize APIs, sign in and allow, then under Step 2 click "Exchange authorization code for tokens" and copy the Refresh token (it starts 1//).
In YOUR-FOLDER create a file named ga4-credentials.json containing this (paste your values, keep the quotes):
{
  "client_id": "YOUR_WEB_CLIENT_ID",
  "client_secret": "YOUR_WEB_CLIENT_SECRET",
  "refresh_token": "YOUR_REFRESH_TOKEN",
  "type": "authorized_user"
}
4. The GA4 connector (the analytics-mcp package you already installed) is configured in Part 8 with the path to ga4-credentials.json and your Project ID.
Why this OAuth method rather than a service account: many organisations block service-account key creation with a security policy (you will see "Service account key creation is disabled"). Using your own login sidesteps that entirely and is more secure.
For worked GA4 reports, channel and landing-page analysis and cross-channel examples, see: Connect GA4 to AI.
Part 6: Search Console
The lightest connector. It reuses your Desktop OAuth client and signs you in via the browser once.
In the Cloud Console, enable the Google Search Console API.
In YOUR-FOLDER create a file named gsc_client_secrets.json. This is your Desktop OAuth client in "installed" format. If you have the downloaded Desktop client JSON, you can use it directly; otherwise build it by hand:
{
  "installed": {
    "client_id": "YOUR_DESKTOP_CLIENT_ID",
    "client_secret": "YOUR_DESKTOP_CLIENT_SECRET",
    "auth_uri": "https://accounts.google.com/o/oauth2/auth",
    "token_uri": "https://oauth2.googleapis.com/token",
    "auth_provider_x509_cert_url": "https://www.googleapis.com/oauth2/v1/certs",
    "redirect_uris": ["http://localhost"]
  }
}
3. The connector (mcp-search-console, already installed) is configured in Part 8 to point at this file. On first use a browser window opens for a one-time sign-in.
For organic-query and content-gap use cases, see: Connect Search Console to AI.
Want it done for you? Explore our SEO audit and SEO management services.
Part 7: Google Tag Manager (build your own read-only connector)
GTM is a configuration tool, not a reporting source, so this connector is for auditing your tracking. Ready-made GTM connectors are full read-and-write tools in other runtimes; instead we use a small read-only Python server so it can only read, and it reuses your existing environment.
In the Cloud Console, enable the Tag Manager API.
Mint a read-only token in the OAuth Playground exactly as in Part 5, but with the scope https://www.googleapis.com/auth/tagmanager.readonly. Save it as gtm-credentials.json in YOUR-FOLDER, in the same authorized_user format shown in Part 5 (with your Web client ID and secret and this new refresh token).
Add the read-only server file gtm_readonly_server.py to YOUR-FOLDER. The full ~150-line file, and a walkthrough, are on the deep-dive page: Connect Google Tag Manager to AI. It exposes only list and get tools (accounts, containers, tags, triggers, variables, the live published version, and an audit summary), so combined with the read-only scope it is locked down two ways over.
The google-api-python-client dependency it needs was installed in Part 3.
Part 8: The complete configuration file
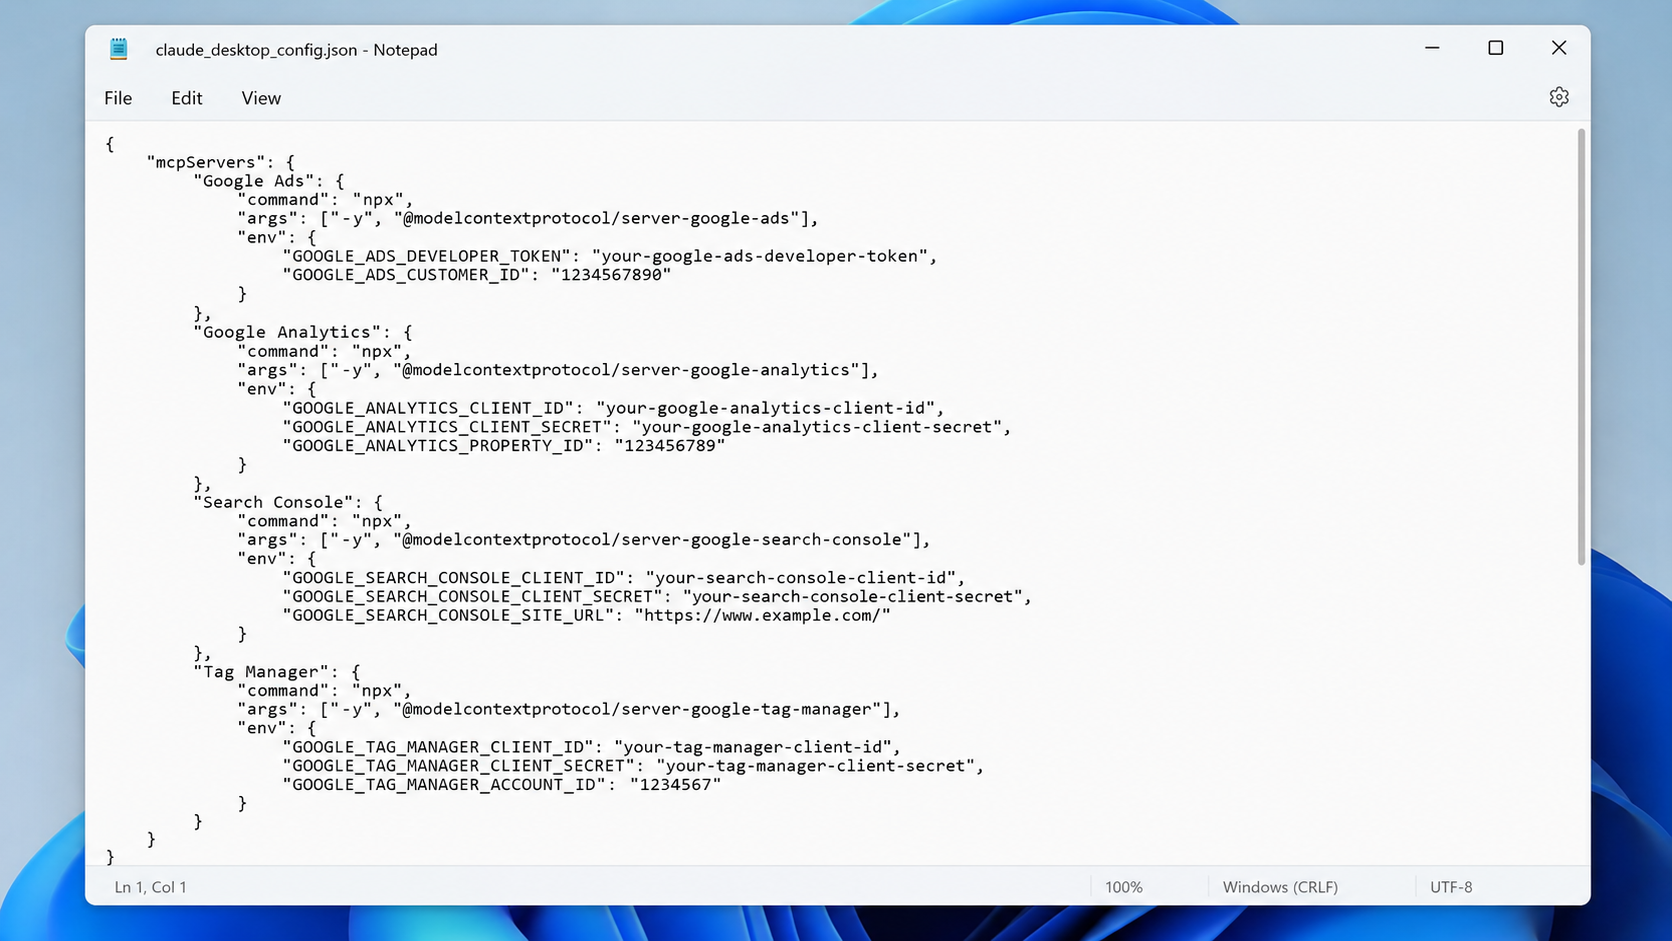
In Claude Desktop, open Settings, Developer, Edit Config. This opens claude_desktop_config.json.
Important: this file may already contain other settings (for example a coworkUserFilesPath key and a preferences block). Do not overwrite the whole file. Keep everything that is there and only add or merge the mcpServers section below. Replace every C:\\Path\\To\\YOUR-FOLDER with your real folder path (note the double backslashes, which are required), and fill in your own values.
{
  "mcpServers": {
    "Google Ads": {
      "command": "C:\\Path\\To\\YOUR-FOLDER\\.venv\\Scripts\\python.exe",
      "args": ["C:\\Path\\To\\YOUR-FOLDER\\google_ads_server.py"],
      "env": {
        "GOOGLE_ADS_AUTH_TYPE": "oauth",
        "GOOGLE_ADS_CREDENTIALS_PATH": "C:\\Path\\To\\YOUR-FOLDER\\credentials.json",
        "GOOGLE_ADS_DEVELOPER_TOKEN": "YOUR_DEVELOPER_TOKEN",
        "GOOGLE_ADS_LOGIN_CUSTOMER_ID": "YOUR_MANAGER_ID_DIGITS_ONLY"
      }
    },
    "Google Analytics": {
      "command": "C:\\Path\\To\\YOUR-FOLDER\\.venv\\Scripts\\analytics-mcp.exe",
      "env": {
        "GOOGLE_APPLICATION_CREDENTIALS": "C:\\Path\\To\\YOUR-FOLDER\\ga4-credentials.json",
        "GOOGLE_PROJECT_ID": "YOUR_PROJECT_ID"
      }
    },
    "Search Console": {
      "command": "C:\\Path\\To\\YOUR-FOLDER\\.venv\\Scripts\\mcp-search-console.exe",
      "env": {
        "GSC_OAUTH_CLIENT_SECRETS_FILE": "C:\\Path\\To\\YOUR-FOLDER\\gsc_client_secrets.json"
      }
    },
    "Tag Manager": {
      "command": "C:\\Path\\To\\YOUR-FOLDER\\.venv\\Scripts\\python.exe",
      "args": ["C:\\Path\\To\\YOUR-FOLDER\\gtm_readonly_server.py"],
      "env": {
        "GTM_CREDENTIALS": "C:\\Path\\To\\YOUR-FOLDER\\gtm-credentials.json"
      }
    }
  }
}
Save the file. Then fully quit Claude: right-click its icon in the system tray (bottom-right, near the clock, you may need the up-arrow to reveal hidden icons) and choose Quit. A normal window close is not enough; the app keeps running in the background and will not reload the config. Reopen Claude.
You can rename the connectors by changing the names in quotes ("Google Ads" and so on) to anything you like; stick to letters, numbers, spaces and hyphens.
Part 9: Test everything
In a new chat, ask each of these. For Search Console, the first call opens a browser for a one-time sign-in; approve it (if you see "Google has not verified this app", click Advanced, Continue, Allow).
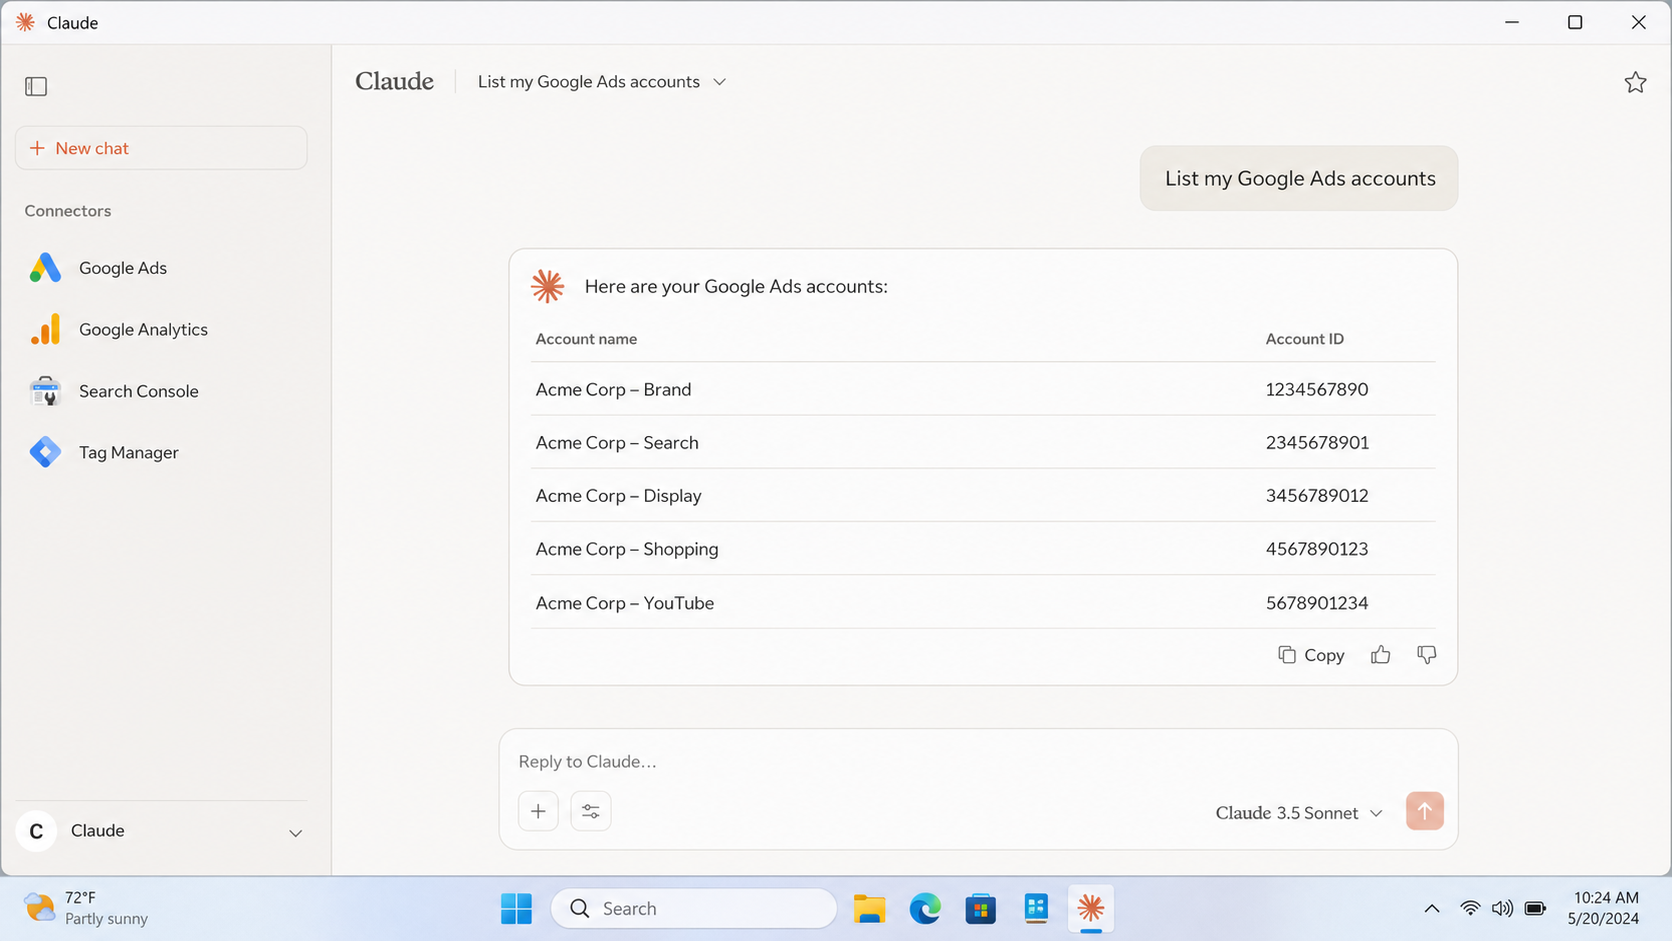
"List my Google Ads accounts."
"List my GA4 properties."
"List my Search Console properties."
"List my Tag Manager accounts."
If each returns your accounts, you are done.
Troubleshooting: every problem and fix
These are the exact issues we hit during a full setup, with the fix for each.
"File does not exist" or credentials not found. Almost always a hidden file extension. Turn on View, File name extensions in File Explorer and check the real name is not, for example, credentials.json.json or gtm-credentials.json.txt. Also watch for hyphen-versus-underscore and typos: gsc-client-secrets.json and gsc_clients_secrets.json will both fail when the config expects gsc_client_secrets.json. The filename must match the config exactly.
Google Ads returns a 404 or "version not found". The community Google Ads connector can be pinned to an old API version. We hit this with v19, which Google has retired. Open google_ads_server.py in a text editor, find the line near the top reading API_VERSION = "v19", change it to a current version (we used v24), save, and fully restart Claude.
Google Ads: "User does not have permission to access customer" with a note about login-customer-id. You are accessing a client account through a Manager account. Add GOOGLE_ADS_LOGIN_CUSTOMER_ID set to your Manager account ID (10 digits, no dashes) in the Google Ads block, then restart. This one setting covers all client accounts under the manager.
Google Ads: "GOOGLE_ADS_CLIENT_ID and GOOGLE_ADS_CLIENT_SECRET must be set if no client config file exists". The connector could not find or read its credential file. Confirm GOOGLE_ADS_CREDENTIALS_PATH points to a real credentials.json (a Desktop OAuth client file). Note: after the first successful sign-in this connector overwrites that file with a saved token, which is expected behaviour.
GA4: "Service account key creation is disabled". Your organisation blocks service-account keys with a security policy. Do not fight it; use the OAuth Playground method in Part 5 (your own login), which does not need a key and is more secure.
GA4: "Unknown field for MetricOrderBy: metricName" (only if you write custom queries). The API expects snake_case in ordering. Use metric_name, not metricName.
A connector worked once, then failed with "Token has been expired or revoked". Two common causes:
You pasted the access token instead of the refresh token. The refresh token starts 1//; the access token starts ya29 and only lasts about an hour. Open the credentials file and make sure the refresh_token value is the 1// one.
Your OAuth consent screen is in "Testing" mode, where refresh tokens expire after about 7 days. Set the consent screen to "In production" (Part 2b) and re-mint the token. Tokens issued in Testing mode keep their short life, so after publishing, re-mint any tokens that were created earlier.
A connector does not appear after editing the config. You did not fully quit Claude. Quit from the system tray, not by closing the window, then reopen.
The Edit Config file already had content. That is normal. Keep the existing keys (such as coworkUserFilesPath and preferences) and only add the mcpServers section. Overwriting the whole file wipes your app settings.
Folder path has spaces or an ampersand. That is fine inside the JSON config as long as you use double backslashes. The address-bar cmd trick in Part 3 also avoids path problems at the command line.
"pip not found" or activation errors. Call the environment's Python directly as shown (.venv\Scripts\python -m pip ...) instead of activating the environment. This avoids PowerShell execution-policy issues.
Understanding tokens (why connectors break and how to stop it)
Two different tokens are at play, and confusing them causes most breakages:
The access token is short-lived (about one hour; you may see "expires in 3560 seconds"). This is normal for every connector. They automatically mint a fresh one using the refresh token, so it never causes a problem on its own.
The refresh token is the durable "master key" that lets a connector get new access tokens without you signing in again. It starts 1//. If this is wrong or revoked, the connector fails with "invalid_grant: Token has been expired or revoked".
To keep refresh tokens durable: publish your OAuth consent screen to Production (Testing-mode tokens expire after about 7 days), and always store the 1// refresh token in your credential files, never the ya29 access token.
FAQs
What is AI marketing, in this context?
How do I use AI in marketing day to day?
Is this really a free Supermetrics alternative?
Do I need to be technical?
Is my data safe?
Go deeper on each connector
Connect Google Ads to AI: search-term and wasted-spend audits, impression-share analysis, worked examples.
Connect GA4 to AI: channel and landing-page reporting, period comparisons, cross-channel analysis.
Connect Search Console to AI: organic queries, content gaps and the page-2 opportunities you are missing.
Connect Google Tag Manager to AI: the full read-only server code and how to audit broken conversion tracking.
Prefer it done for you?
If you would rather not build this yourself, Align & Scale can run the audits and reporting for you. Work with us, or find your marketing bottleneck in 60 seconds to see where to focus first.